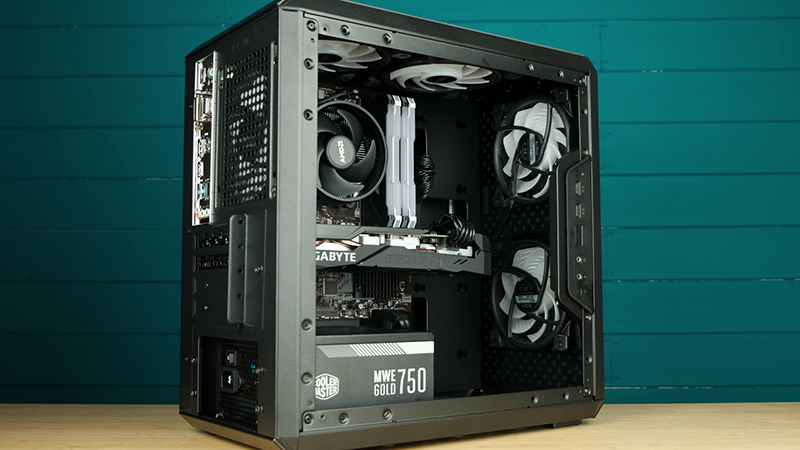
What’s up guys – today I want to show you guys the latest Gaming PC build I’ve done for around 1000 dollars. It features Ryzen 5 3600 and it’s paired with RTX 2060 Super graphics card.
This mid-range PC performs amazingly well in 1080p high refresh rate gaming, 1440p gaming, or even streaming on Twitch or Youtube.
At first, I will go through each and every part I’ve picked, and then we will surf through benchmarks and check those FPS numbers together.
So let’s get started.
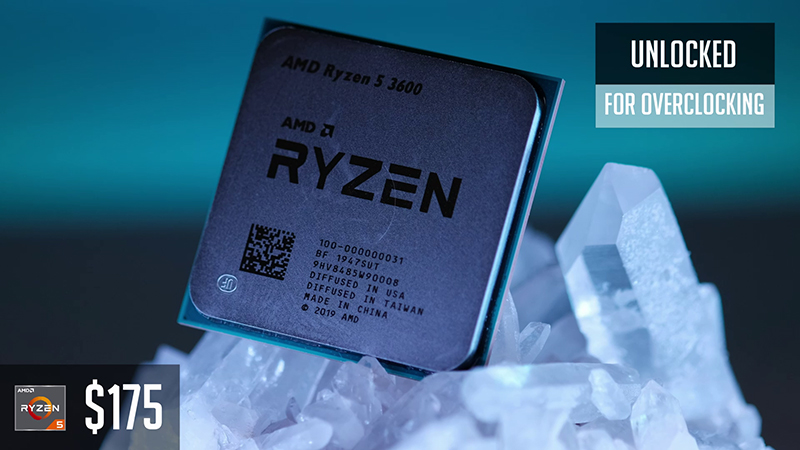
And so we start with a CPU – it’s 3rd gen Ryzen 5 3600, especially good value for gaming. With 6 cores and 12 threads, it will be able to handle your games with no probs, but also it will run some twitch streaming perfectly. And since all Ryzen processors are unlocked for overclocking, you can play around and squeeze even more performance out of this chip. Sure, you will probably need to buy an aftermarket cooler, but hey, you can find a decent one for 20 bucks already. As for this build, we will stick with an included wraith stealth cooler with the possibility to upgrade it later on.
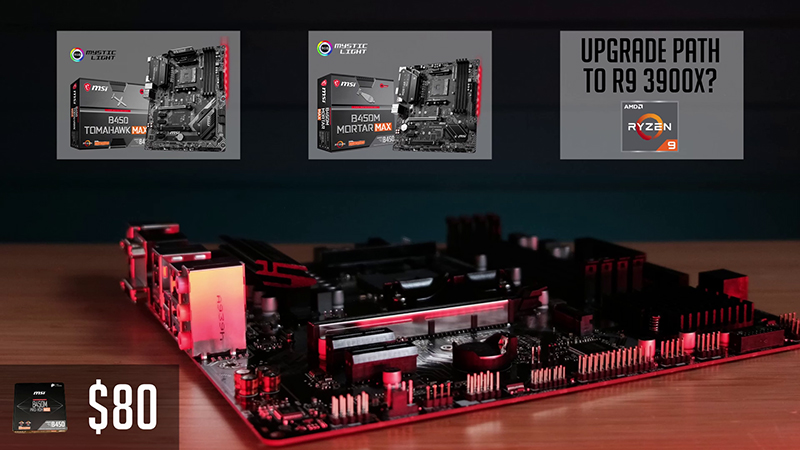
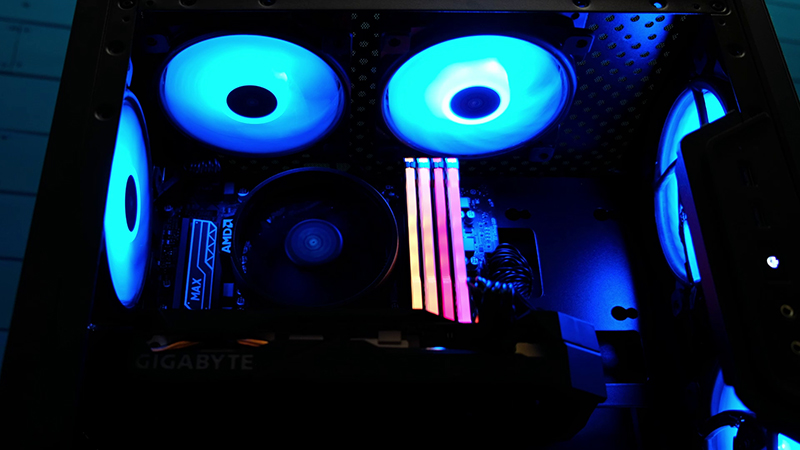
Moving forward, I have an MSI B450M PRO-VDH MAX motherboard. Well, I always recommend spending $30 more for a B450 TOMAHAWK or MORTAR motherboard from MSI. They do have much better VRM and their cooling so they can handle better overclocks and better support for a possible upgrade path to let’s say Ryzen 9 3900x. But currently, none of these were available locally at a time I was buying parts. But don’t get me wrong, B450M PRO-VDH MAX will get a job done and still has some nice features such as 4 RAM slots and an RGB header.
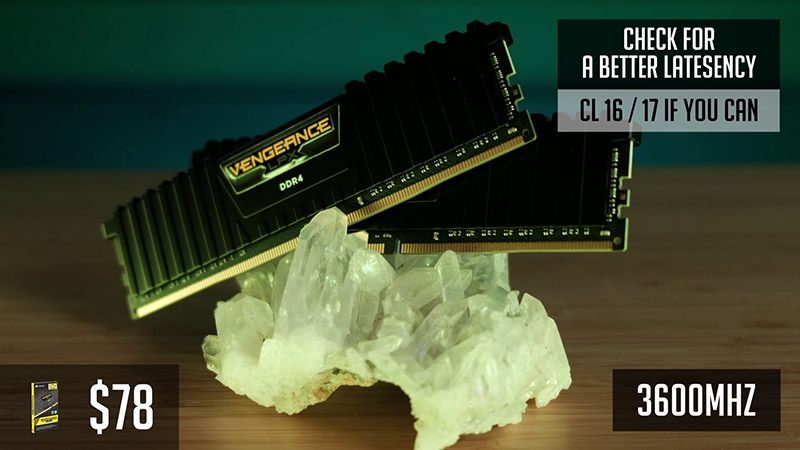
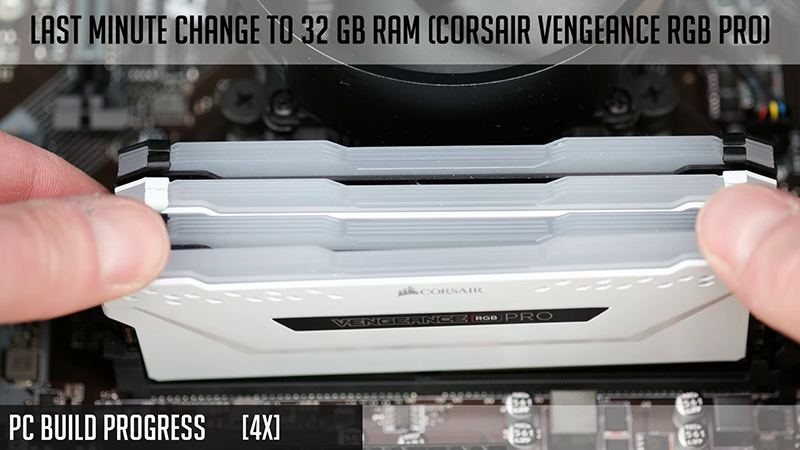
Next, we have 16 GB of DDR4 memory, that’s clocked at 3600 MHz. But in general, any brand RAM is good enough as long as you buy 3600Mhz with a better CAS latency like 16 or 17. Just make sure you enable the XMP profile in your BIOS since it will unleash the full potential from your RAM sticks.
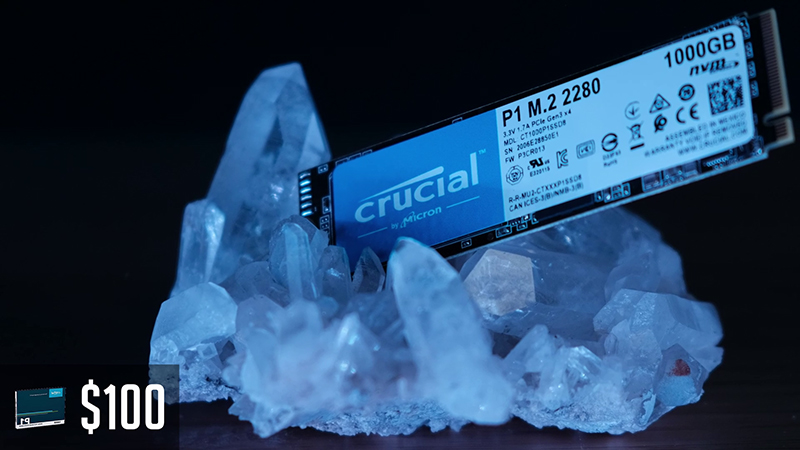
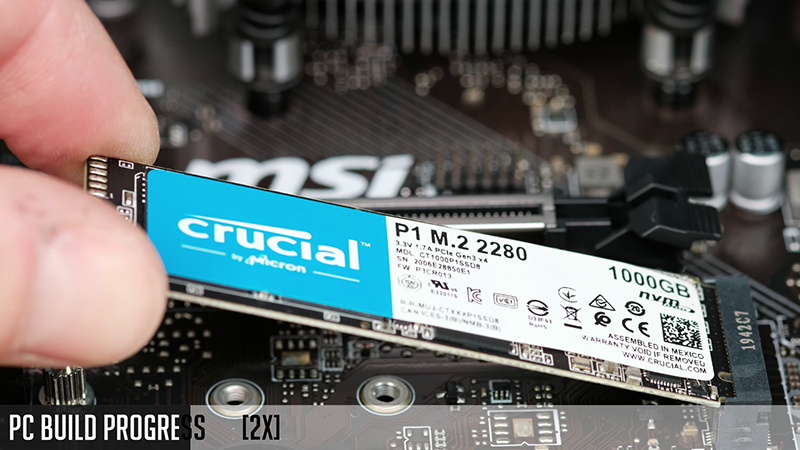
And now for the storage, I got a single 1TB NVME SSD from Crucial (Crucial P1). NVME SSD’s are quite cheap already so you can find them as low as a regular SATA SSD price. And one of the benefits of using m.2 SSD you do not need any cables for that so it’s a much cleaner build and you can utilize much faster speeds.
But sure, there are plenty of options on how you can set your storage combination. In case you really need lots of storage and 1TB is not enough, you could buy 250 GB or 500 GB SSD as your main drive and pair it with a 2TB Hard drive. Just be sure you get 7200 rpm one.
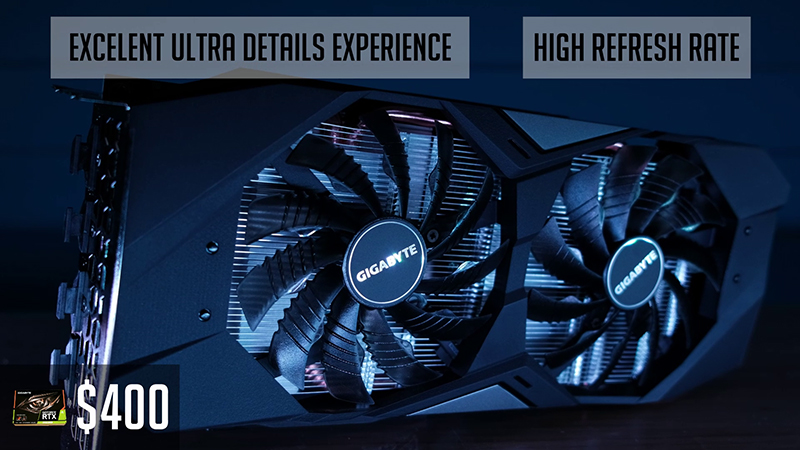
For the graphics card, I’ve chosen Gigabyte RTX 2060 Super. And sure, for the same price you could buy a bit faster card like RX 5700 XT. But at the time I was purchasing these parts, AMD still had lots of issues with drivers and this uncertainty helped to make a decision.
I needed a reliable plug-and-play graphics card since a person that will be using this PC would not need to worry about potential issues and so on.
But having in mind feedback after the latest Radeon drivers release a week ago, you might see the next build with an AMD card. As it seems AMD managed to fix lots of issues people had with Navi GPUs.
Anyway, 2060 Super will provide tons of headroom for a high refresh-rate 1080p gaming pared with a monitor that can achieve 144hz or more. As well as really awesome 60 to 100 FPS experience using Ultra details on triple-A titles.
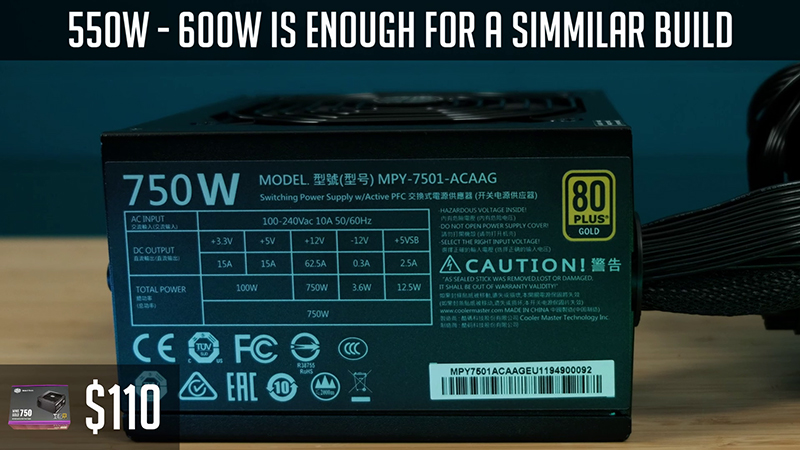
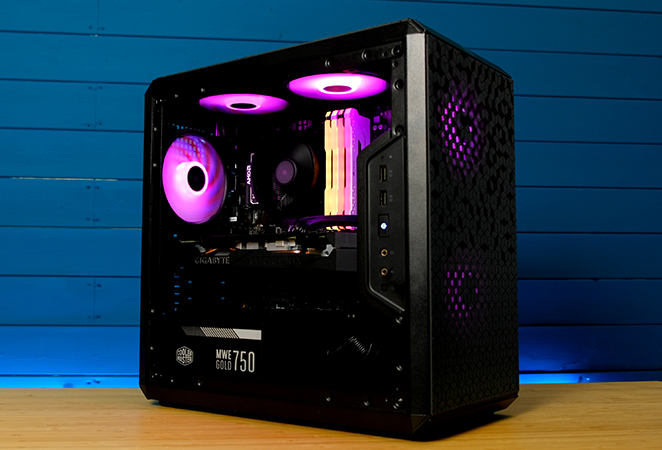
And for the power supply, we got a Cooler Master MWE 750 watt Gold unit. Yeah, it’s quite an overkill for such a system, but originally, I was planning to take 600 watts Be quiet! Pure Power PSU. Unfortunately, it went out of stock just after I ordered and this one was the best I could find having in mind really limited local stock at the moment. Anyway, with a 750watt power supply, you can have lots of headroom for the feature.
In case you decide to upgrade a CPU and a GPU to let’s say Ryzen 9 3900x and an RTX 2080 Super or to an upcoming RTX 3000 series graphics card.
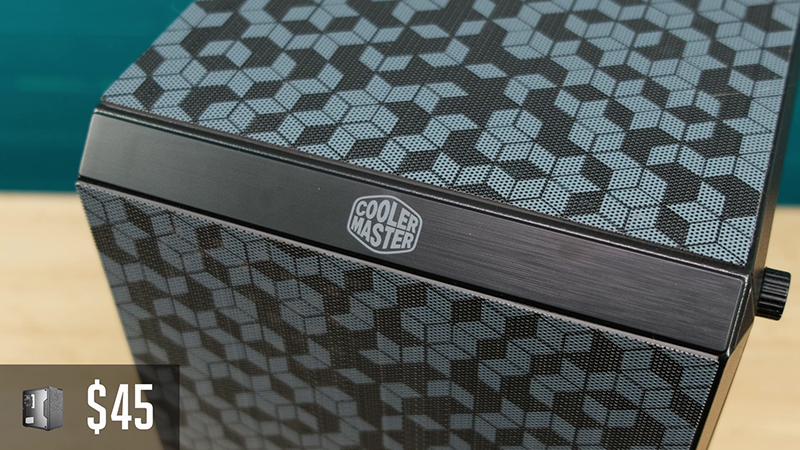
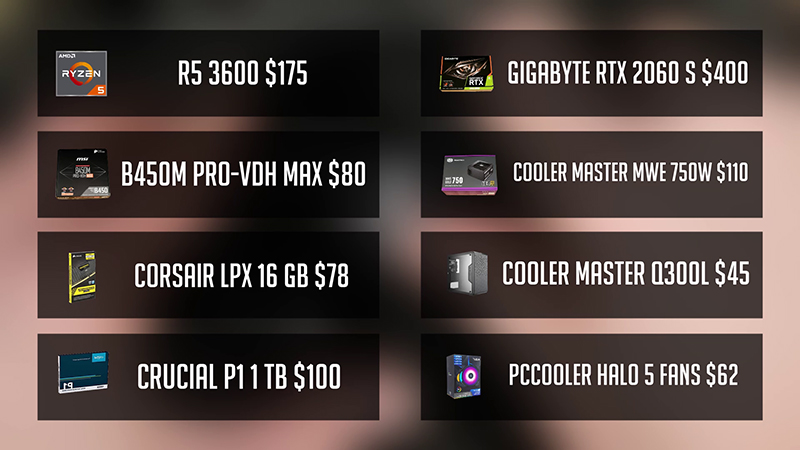
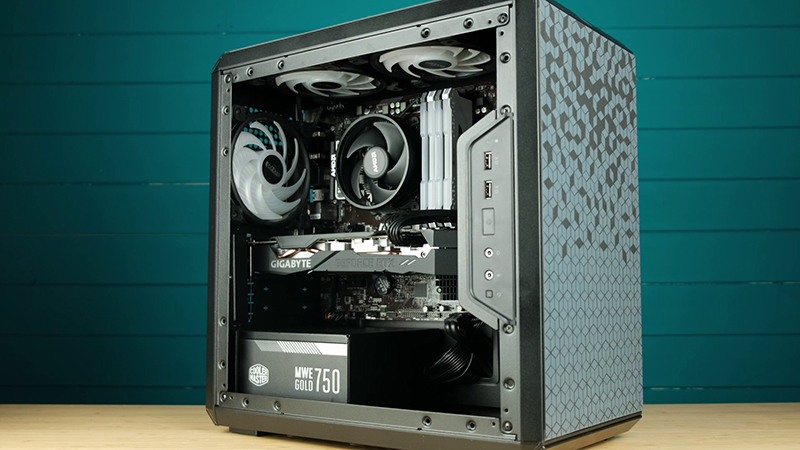
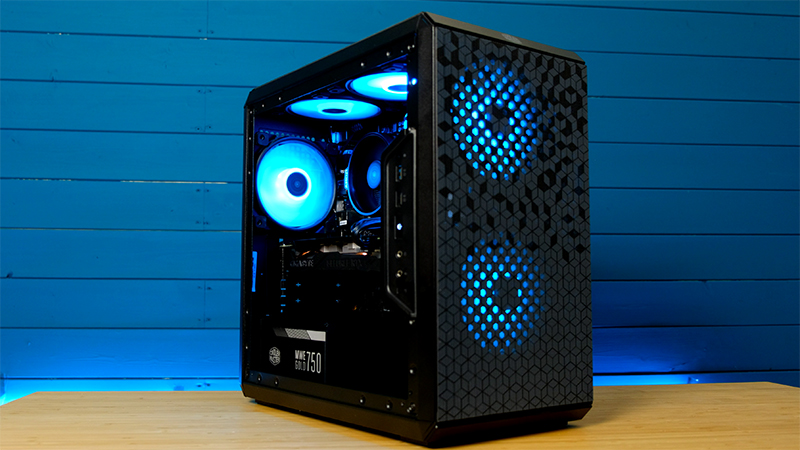
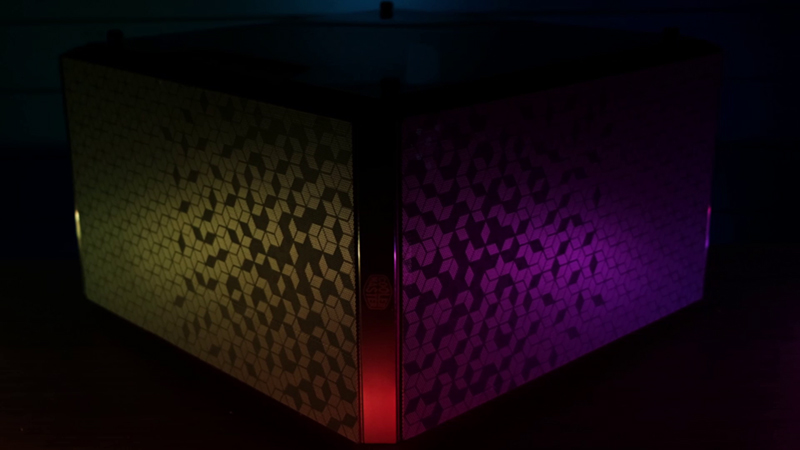
Since we will be using mATX motherboard, I’ve gone for a smaller, nice-looking mATX case as-well. It’s non-other than Cooler Master Q300L. It’s a budget PC case for around 45 US dollars. I like it has unique-looking dust filters at the front and at the top. You get an OK airflow in case you use more fans as well as you are able to see the RGB illumination.
I’m already working on an unboxing video of this case and so when it’s done, I will put a link at the top right corner.
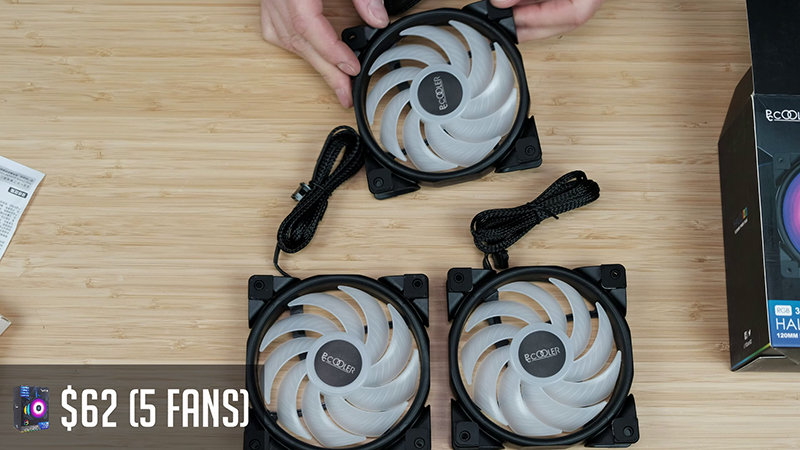
And the last component before I start building is a PCCOOLER Halo RGB fans. I know you can stick with one included rear case fan, but I always recommend having at least 2 fans. I’ve added a bit more than that, just to ensure there is enough airflow during long gaming sessions and well, 5 fans look way better than 2. I use the same fans in my personal rig and they are really good for the price.
So all of that comes out to 1050 US dollars. Keep in mind, prices tend to change. And so you might see different ones as it depends on when you watch my video. But in case of doubt about which part to choose, you can always post a comment on my Youtube channel and I will gladly suggest a few alternatives you can go for.
Also, you will find Amazon links to all these parts at the bottom of this post.
All right, enough about the parts and let’s look into some FPS numbers. In total, I’ve tested this build in 10 games and one synthetical benchmark. In some of the games, I’ve used build-in benchmarks and others I’ve tested as in-game play.
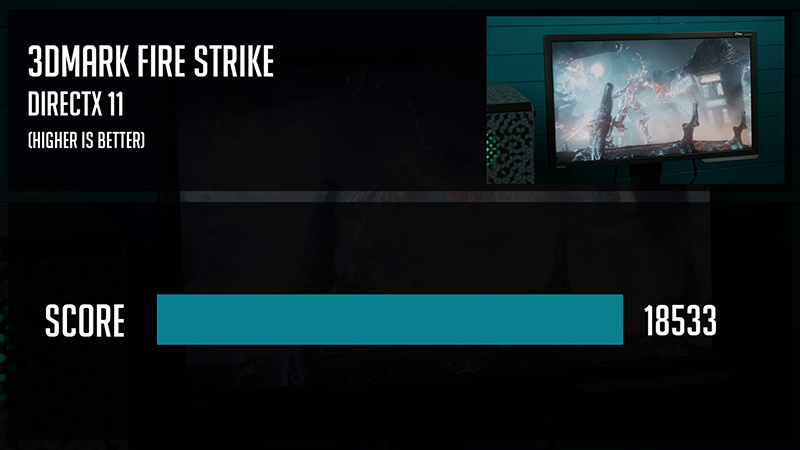
So, firstly, I’ve run a traditional 3DMark Fire Strike benchmark and PC scored 18533 points.

And so we start a game benchmark with esports titles.
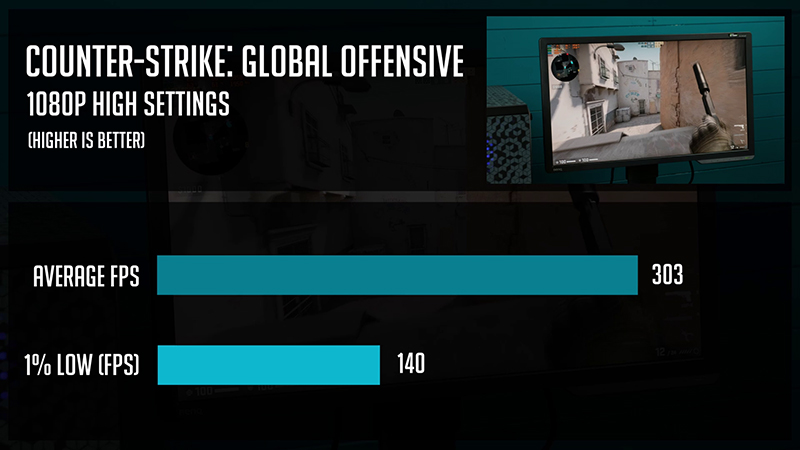
Well, CSGO is not a particularly demanding game for such a build, and so at 1080p with the highest settings I’ve got over 300 fps on average. So it’s suitable for anyone that has a high refresh monitor, even 240hz one for a competitive play.
Next up we have Fortnite. Using Epic settings I’ve got 136 fps on average with 87 fps as 1% lows. So, lowering a few settings will help you get stable 144 fps on average in case you have a high refresh monitor.
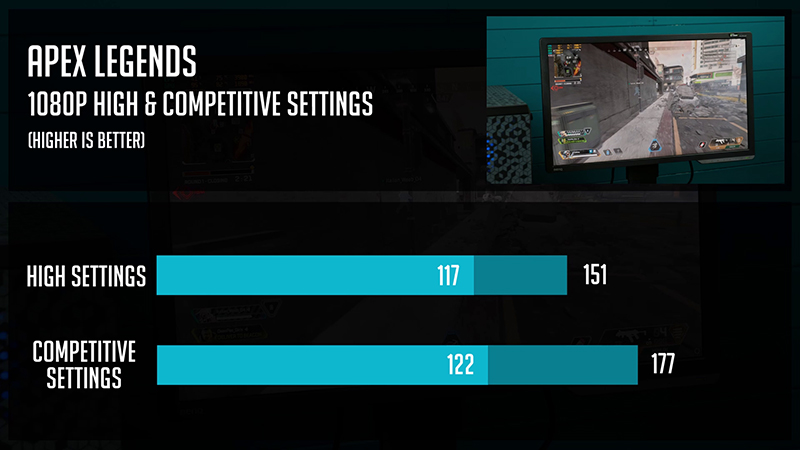
Framerates in Apex Legends were really consistent and gave a really good result even at the highest settings. And so 151 fps on average and 117 fps as 1% lows provides really good experience in this game.
For curiosity, I’ve benchmarked this game with competitive settings as well and ended up with 177 fps on average meaning more than a 15% increase in performance.
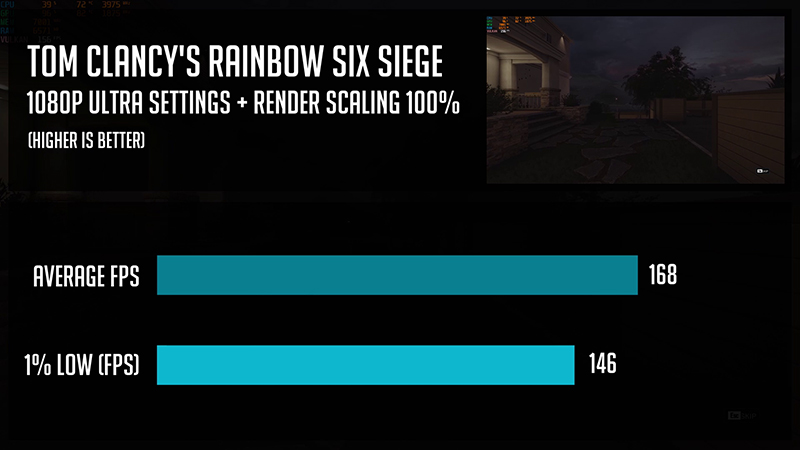
After a few requests from my viewers, I’ve decided to add a game I’ve never tested on my channel before – Rainbow Six Siege. Well, using in-build benchmark I’ve got 168 fps on average and 1% lows were amazing as-well.
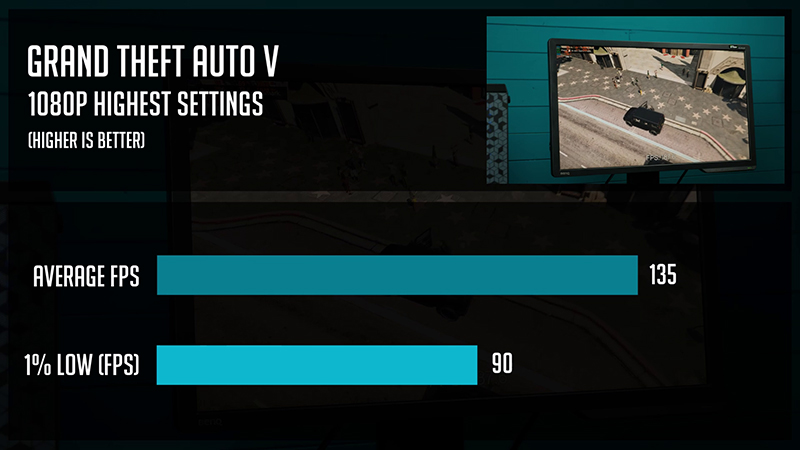
Still, one of the popular older titles GTA V. You can enjoy playing this title with tons of FPS as-well since the benchmark gave me 135 fps on average and 90 fps as 1% lows.
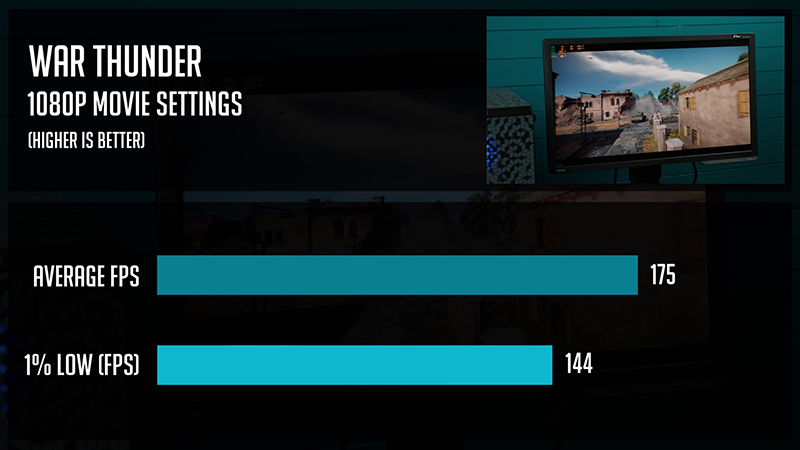
War Thunder is another game I’ve decided to add to my benchmarks. And since there are many in-build tests, I’ve run the one that it’s seems the most popular in forums. Meaning I’ve chosen the Tank Battle benchmark with the highest Movie settings. And so I’ve got 175 fps on average and 144 fps as 1% lows.
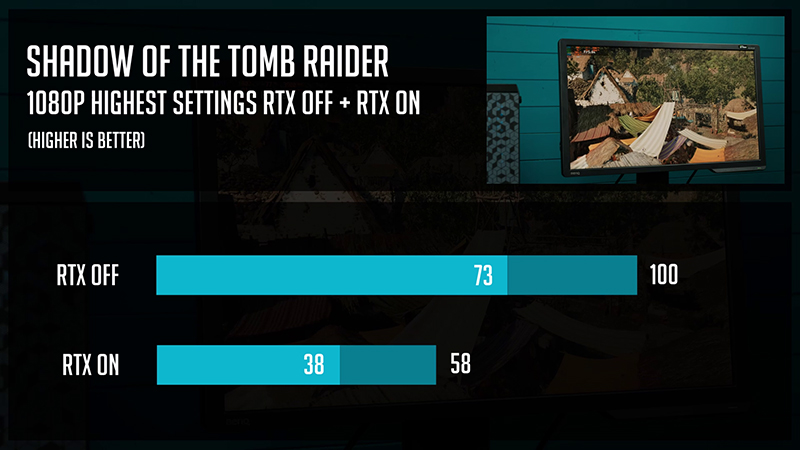
Next, we have a few more demanding games. Staring with a Shadow of The Tomb Raider. It’s more than enough performance with the highest settings and RTX off (100 fps on average). But turning RTX ON reduced FPS almost by half (58 fps on average). But I would say it’s still decent numbers and in case you want to achieve over 60 fps, just set a few settings to High instead of Ultra and you will be fine.
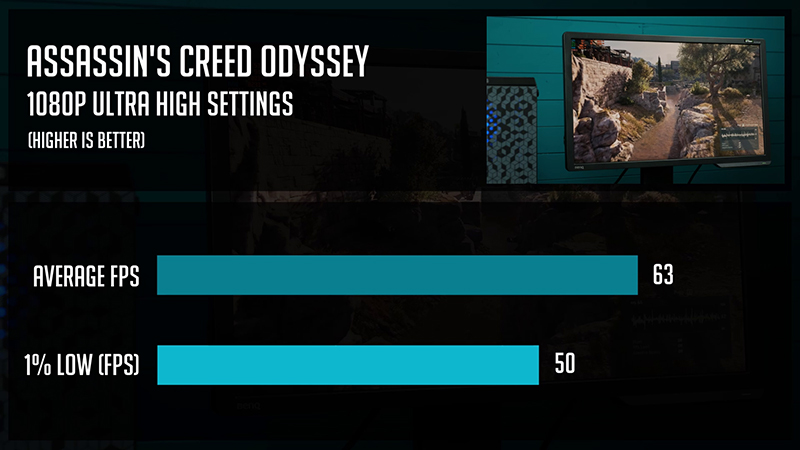
Using Ultra high settings I had no probs getting over 60 fps in Assassin’s Creed Odyssey. And 1% lows were quite decent as well around 50 fps.
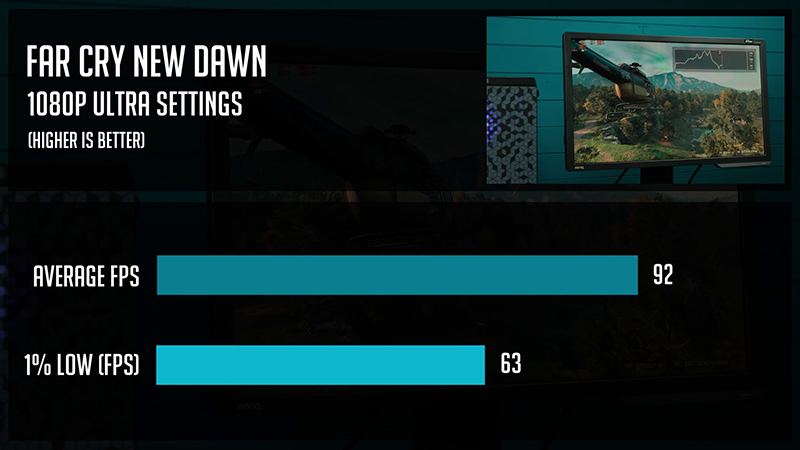
Far Cry New Dawn is another title I’ve tested and we can enjoy the best experience here as-well. Over 90 fps on average and 63 fps as 1% lows using Ultra quality preset.
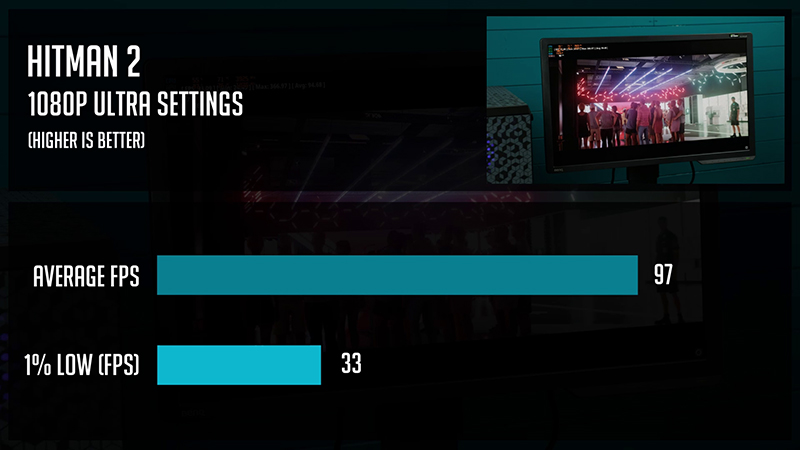
And the last game I’ve benchmarked on this $1000 PC is Hitman 2. Using Miami in-game benchmark, I’ve got 97 fps on average. But I would say that 1% lows number was quite lower than in most of the similar game benchmarks.

So to wrap up, it’s a nice-looking compact PC Build. It’s is capable of running high refresh rate esports titles and playing such games as Fortnite, Apex Legends and others will give you the best experience and competitive advantage. Also, it provides a nice experience even on most demanding triple-A titles like Assassin’s Creed Odyssey or Shadow of The Tomb Raider even with RTX enabled.
That’s it for today’s PC build video. Thank you so much for watching and if you enjoyed this build, do not forget to visit my YouTube channel and subscribe since you will help to bring even more builds and new content to you guys.
And see you soon.
Links to a Gaming PC Build parts
CPU – Ryzen 5 3600
https://amzn.to/2UzJOrC (US)
https://amzn.to/2QsJQ3n (UK)
RAM – Corsair Vengeance LPX 16GB
https://amzn.to/39t367C (US) https://amzn.to/38WHpwd (UK)
SSD – Crucial P1 1TB
https://amzn.to/2R4zVkX (US)
https://amzn.to/3baEMIR (UK)
PSU – Cooler Master MWE 750W Gold https://amzn.to/2ycZeup (US)
https://amzn.to/2ISTw2Z (UK)
Fans – PCCOOLER Halo (RGB)
https://amzn.to/2QM3nvS (US) https://amzn.to/3djXOOS (UK)
Motherboard – MSI B450M PRO-VDH Max
https://amzn.to/3brDqth (US)
https://amzn.to/3dfp2Gr (UK)
RAM – Corsair Vengeance RGB Pro 16GB
https://amzn.to/2WIB7hr (US) https://amzn.to/2Wq5t8m (UK)
GPU – GIGABYTE RTX 2060 SUPER WINDFORCE OC
https://amzn.to/2QPB5jZ (US)
https://amzn.to/3a3NgRY (UK)
Case – Cooler Master MasterBox Q300L
https://amzn.to/2UECBGD (US) https://amzn.to/2J06aNm (UK)
Disclosure: EpicGameTech gets a small commission when you purchase something via our Amazon links. It doesn’t cost you anything extra since that comes from Amazon’s end. So, please be aware, the links provided to Amazon are affiliate links.